Botanical Inklings: the letterpress coloring book printed on watercolor paper

Botanical InklingsI’ve been working on a great big giant very very large project that I’m finally ready to share with you!  I’ve been wanting to do a letterpress coloring book for ages, specifically on watercolor paper, because I don’t want to be limited to pencils and crayons when I color, and the paper in the coloring books you buy at the store is crap.  Some of the nicer ones are moving toward heavier paper, but you still can’t use wet mediums in them.

So I’m making the coloring book of my dreams from my own botanical illustrations.  If you follow me on Instagram, you’ll already know that I’ve been a bit obsessed with macrophotography lately, and my illustrations are inspired by the pictures I’ve taken.

In order to make the coloring book a reality, I need to raise money for the printing plates and paper, so I’m doing a Kickstarter.  Find out all about here, and then go tell all of your friends.  Every pin/post/tweet counts, but also identify some personal acquaintances that you think would be interested and send them a message.  Personal messages are way more effective than most pins/posts/tweets.

Thank you!

This slideshow requires JavaScript.

Posted in Uncategorized | Leave a comment

Simple Purse Book with Handles


I posted a picture of two books with handles my daughters made out of grocery bags on Instagram a couple weeks ago and got a request for a tutorial, so here it is!  My eight-year-old has made more books than most adults, so this was a cakewalk for her, but my three-year-old’s first, and she did most of the work herself with very nice results. Obviously, I was directing every step of the way, but by the end her dexterity had improved markedly. Making books is good for fine motor skills, pattern recognition, and literacy. But I don’t need to sell you on it; if you’re here, you’re already drinking the KoolAid.

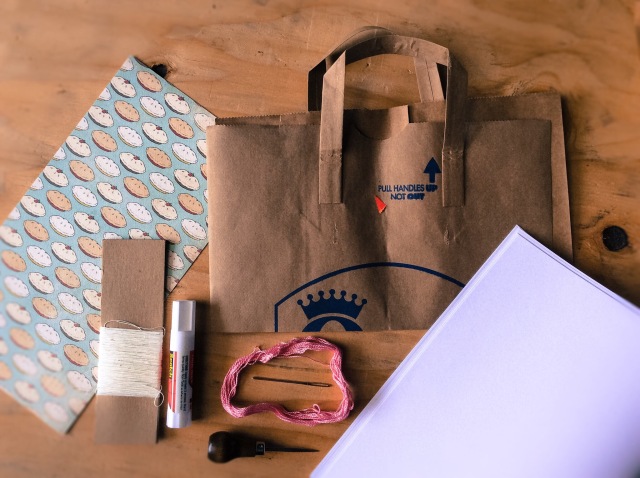
First, gather supplies. We used friendship bracelet string, darning needles with big fat eyes, brown paper bags with handles, my awl, and eight sheets of 11″x17″, and some cute, heavy, 12″x12″ scrapbook paper, and a glue stick.

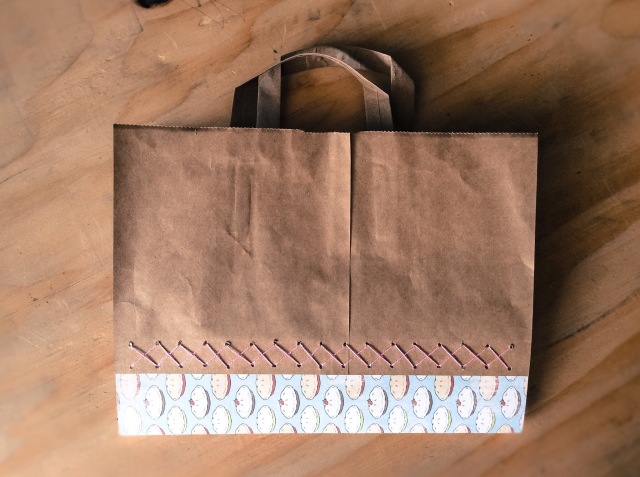
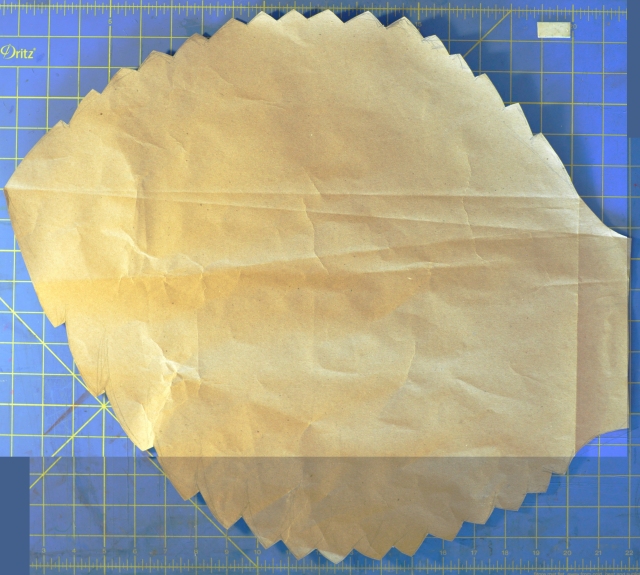
 Cut 7″ off the top of your bag, keeping the handles. Then cut the sides of the bag off–should make it 12″ wide. 

Cut your scrapbook paper in half, then fold it in half lengthwise. Don’t make the crease very sharp. Just enough for you to know it’s there or the pages won’t sit snugly inside. 

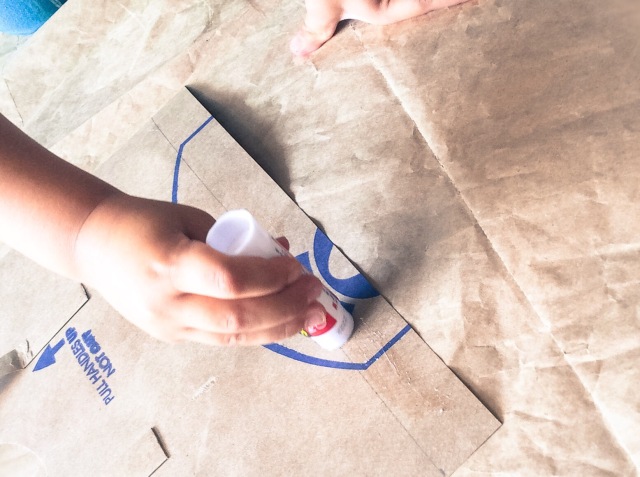
 Glue the brown bag pieces to the scrapbook paper, overlapping 1″. I penciled in a guideline for my daughter to follow so she could do the gluing. 

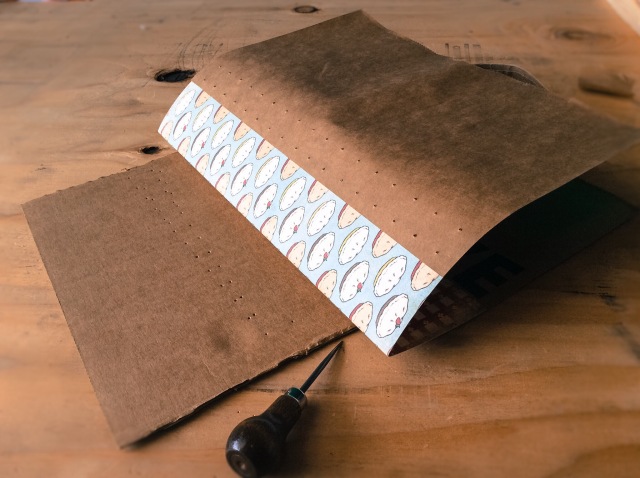
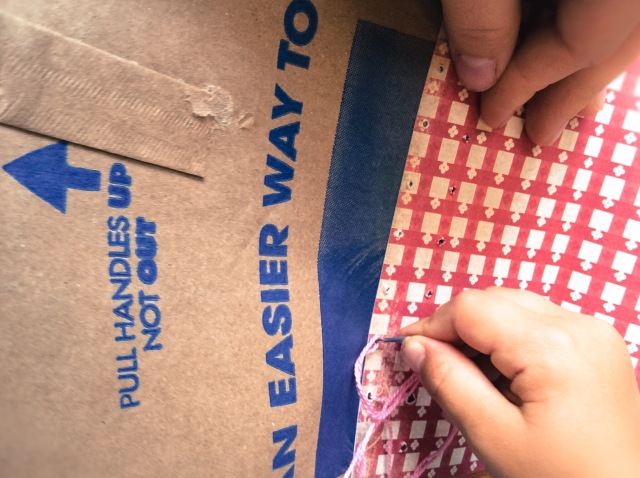
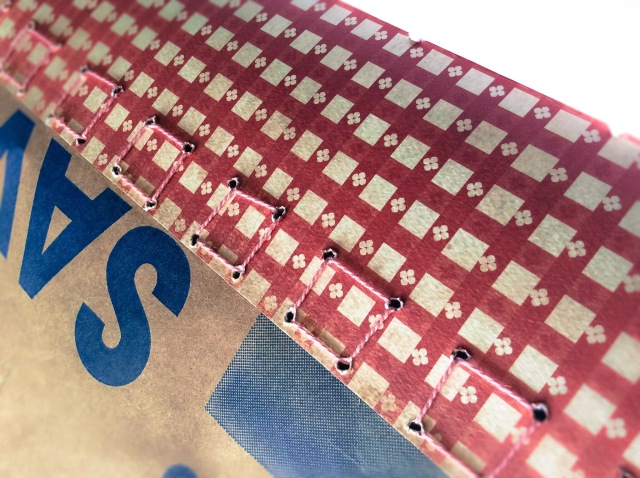
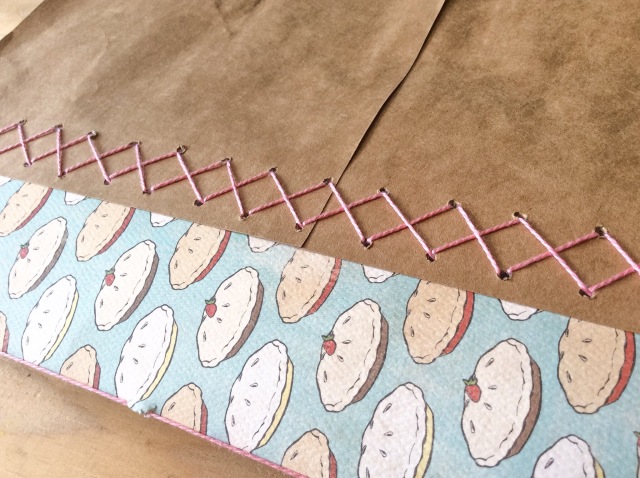
 Since glue sticks don’t adhere permanently, no matter what the label says, I thought it would be cool to do this cross stitching. I put cardboard underneath and used my awl to poke a pattern of holes inside that inch where the scrapbook paper and brown bag overlap. 

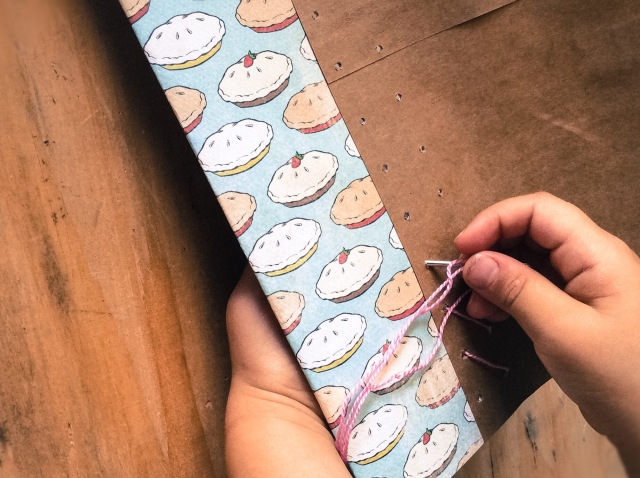
 I directed my daughter where to insert her needle and supported the paper so it wouldn’t get mangled as she sewed. 


Fold the eight 11″x17″ pieces of paper in half. 

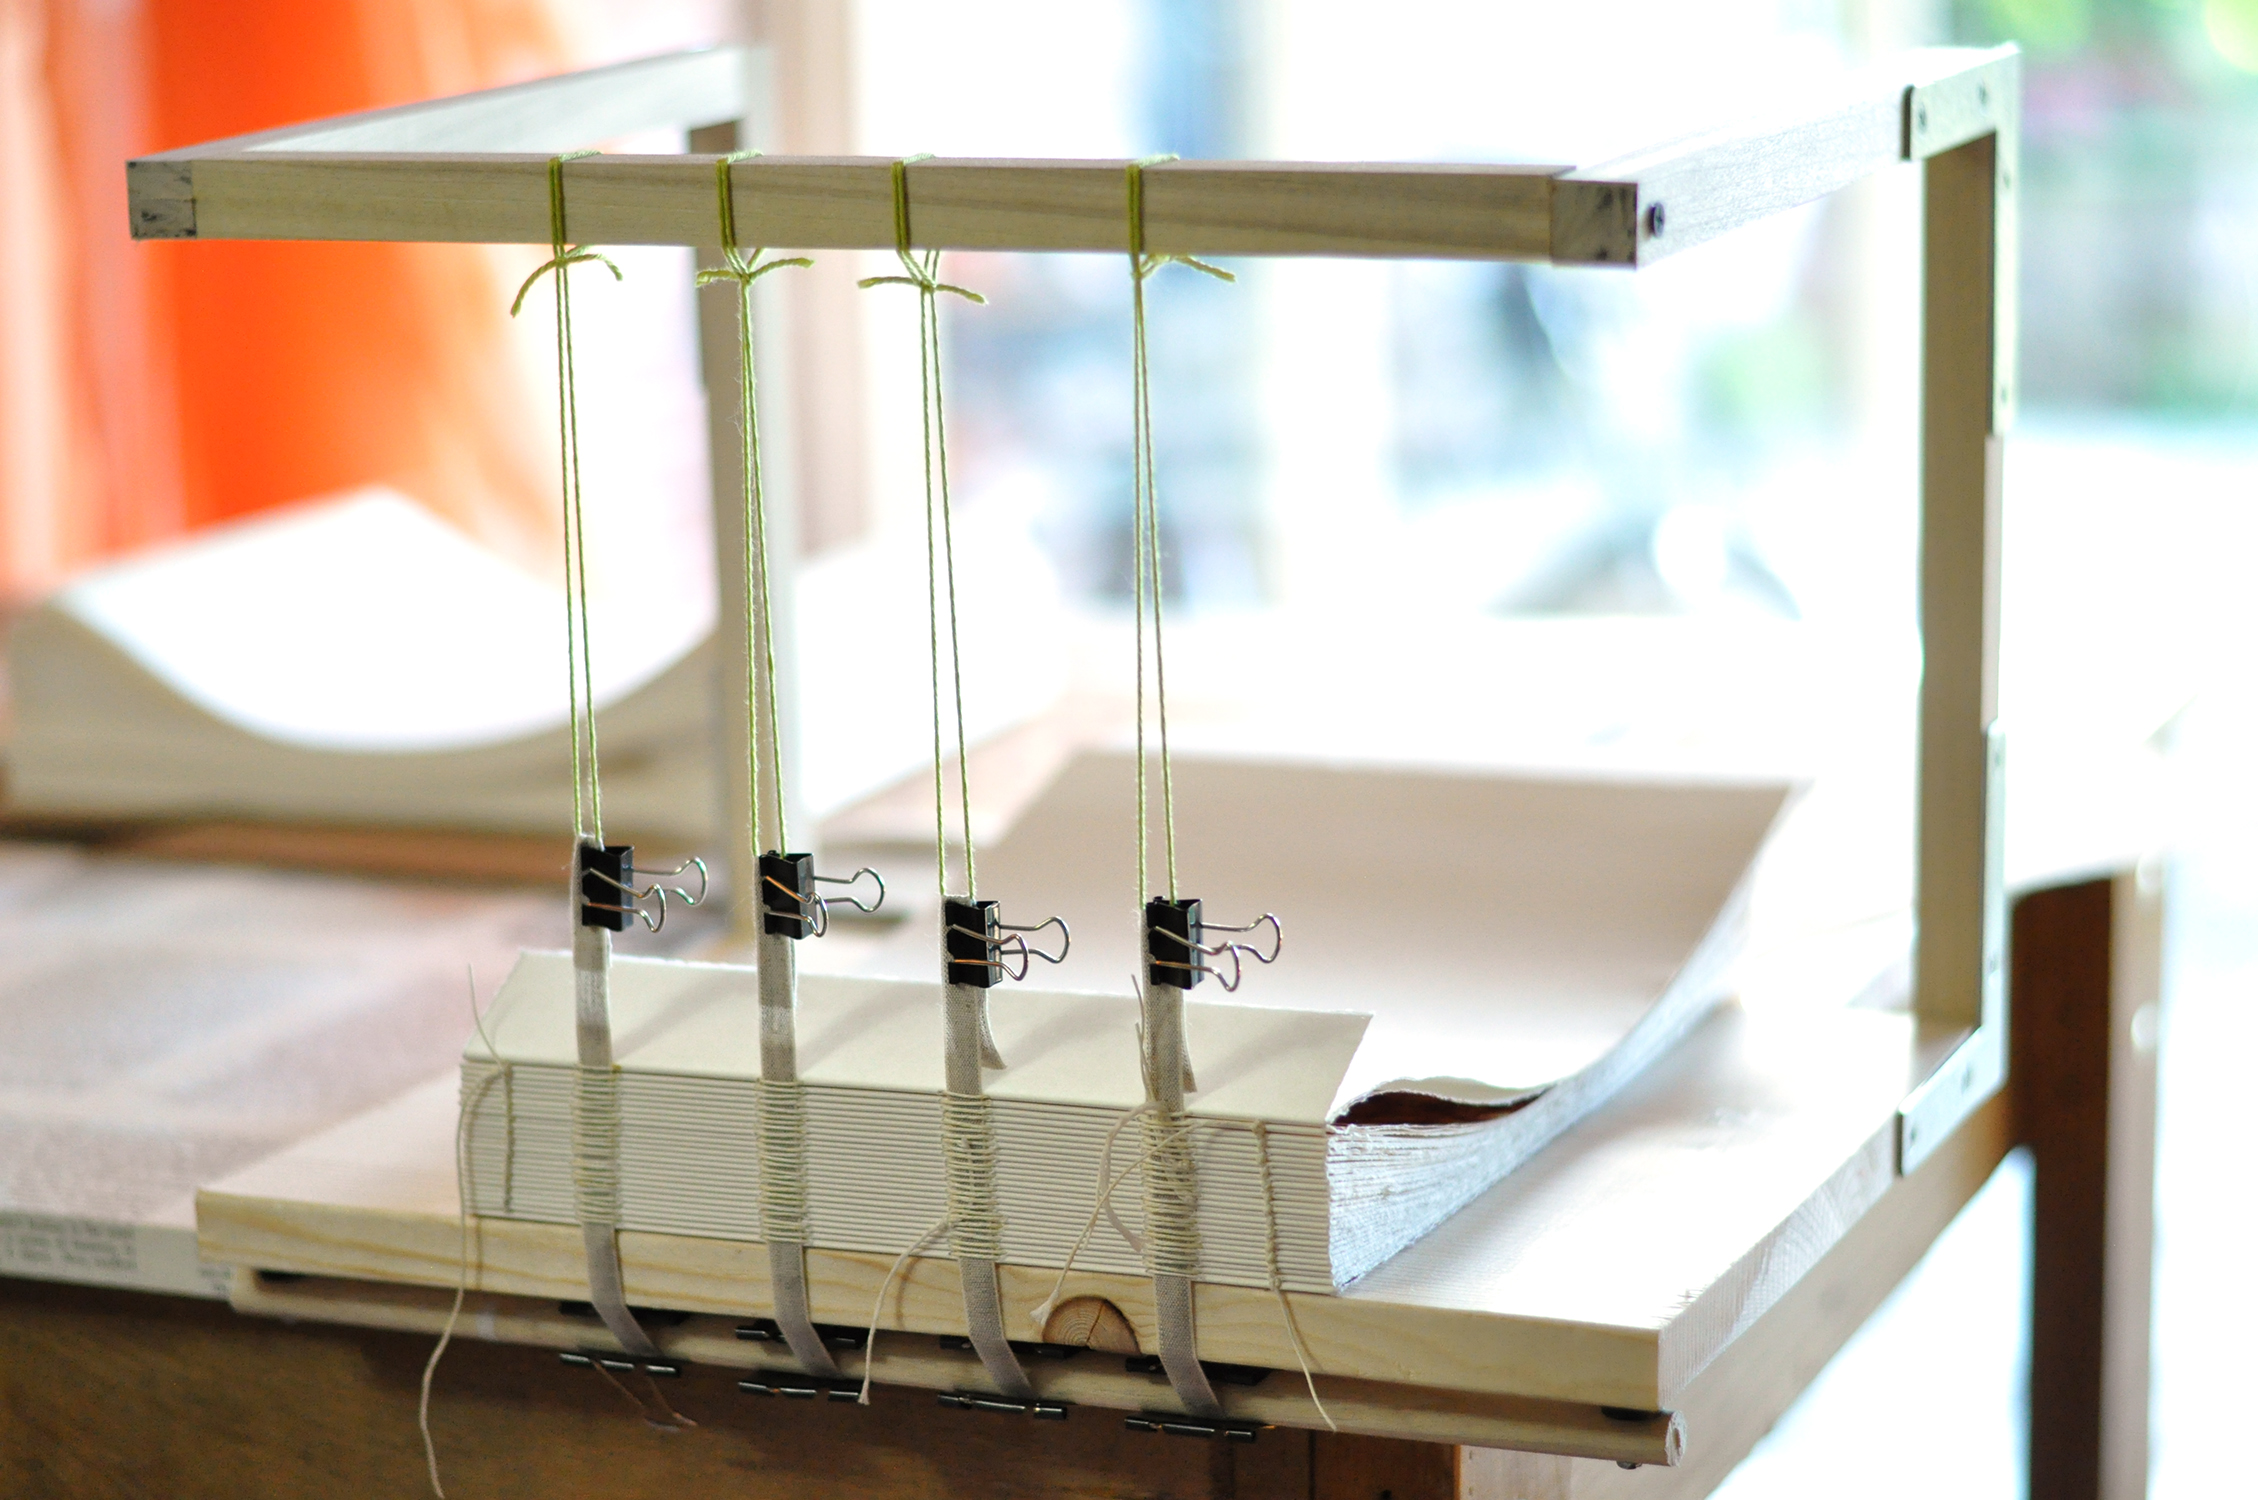
 Center the pages in the cover, clip the pages to the cover to keep things from sliding around, and poke five evenly spaced holes in the gutter. 

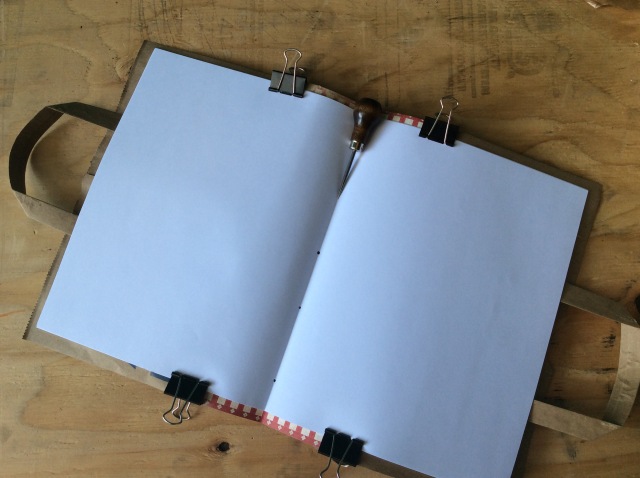
 I blogged about the pamphlet stitch before, which is what we’re doing here. Check out that post for a clear illustration.  Starting on the inside, go through the center hole, then outside in through the next hole up, inside out through the top hole, outside in through the next hole down (this is your second time through this hole), skip the middle hole and go inside out through the hole below the center hole, outside in through the bottom hole, inside out through the second hole up, outside in through the center hole. 

 Now you have two tails coming up through the center of the book. Tie these together in a square knot over the string that spans the space between the two adjacent holes. 

 And you’re done! 

Posted in Arts and Crafts, Bookbinding, Paper Arts, Scrapbooking | Tagged , , | 2 Comments

Spice Drawer Spice Jar Labels

If you ever dig through a cupboard wondering where on earth that spice is, this might be for you.  If you ever curse as spice jars topple out of the cupboard in your search, this might be for you.  If you’re super anal about organization, this might be for you.

Peace of mind in a chaotic kitchen.

Peace of mind in a chaotic kitchen.

I hated doing this, and I like super cute labels that make things easy to find, so I made super cute labels, cut them out with my 1.5″ circle pouch, ModPodged them to half-pint mason jar lids, hot glued the lids and rings together, filled the jars with spices, and put them in a drawer the exact height to fit said jars right next to my stove, and gazed in adoration at the spices clearly visible in neat rows.  And then I thought, “It was a lot of work making those labels, and they are super cute.  It would be a shame to keep them to myself.”  So here is a PDF of the spice jar labels.  If you’re savvy, you could easily change the color in Photoshop.  Or you could just take the idea and make your own.  Have fun NOT yelling at your spices.

Posted in Arts and Crafts, Culinary Arts | Tagged , , , , , | 2 Comments

Don’t be Afraid to Suck

really bad hand lettering

Terrible first attempt at lettering.

Because sucking at something is the first step towards being kind of good at it.
I became interested in hand lettering around the time I quit my job to be a stay-at-home mom. I was terrible at it. And I suffered from a crippling perfectionism that made me scared to try and my failures tore down the courage it took to begin with. Enter my first art journal on the cover of which I wrote in big letters, “An Exercise in Imperfection.” Yes, it took a lot of agonizing to get it “right.” The point is, I was giving myself permission to screw up whatever I put in this book. Don’t matter, don’t care, just do it. I’d like to say that was the end of my struggles, but it wasn’t. Five years later, I still struggle. The more I fantasize about a project, the harder it is to get started. I’ve built it up too much in my mind. But I struggle less. You know my giant sketchbook? I made it so big so I could draw the same idea over and over again on the same page so I could monitor my progress, repeat the things I did well, and improve the things that sucked. I’ve reached the point where I know it’s not going to work the first time, but with persistence, I know I can get it there. I’m even comfortable offering it as a service.
Mid century modern lettering by Sarah (whynoteight.wordpress.com)My Our Adventure Book is the most popular item in my Etsy shop, and people frequently ask to customize it in some way–usually adding a globe or leather tie to the cover. My two favorite customizations so far have been with lettering. One guy wanted to use the album to propose to his girlfriend and he wanted to put pictures of the two of them in the first few pages with a title page saying, “What We Did,” and other dividers for guest signatures at the wedding, pictures of their wedding, their honeymoon, and for the future. I thought it would be awesome to model these dividers after vintage travel posters, but for cost reasons, he opted for just one poster-y divider and the rest were simpler. When I agreed to this project, I had never done anything like this, but I gathered some inspiration from Pinterest on lettering from that era and just got going–no obsessing. The shipping deadline helped with that 😉

Rejected first try.

Rejected first try.

The second guy also wanted to use the album to propose to his girlfriend. His idea was to hide the ring in the book somehow and I made a couple of suggestions. I could make the back cover thick enough to carve out a space for the ring, or I could just put a petal envelope somewhere in the book with the ring inside. I thought it would be cool to do some lettering saying, “Will you marry me?” But he returned with, “Will you join me on a new adventure?” which I thought was adorable. He rejected my first try, which was fine by me. Based on his feedback, I tried to come up with a different composition and decided the square petal envelope was really holding me back. I first thought of the petal envelope because it would be easy to get the ring out, but I thought there’s got to be a way to have the ring sort of pop up when opening a regular envelope so she wouldn’t have to fish around for it. So I devised this envelope (after many prototypes), and the ring slides up when it’s opened.

pop-up ring envelope by Sarah (whynoteight.wordpress.com)

Then the composition fell into place, and the lettering looks much nicer.

Hand lettering sketch by Sarah (whynoteight.wordpress.com)Lettering with envelope by Sarah (whynoteight.wordpress.com)lettering with envelope by Sarah (whynoteight.wordpress.com)

Now back to the real message of this post. Don’t be afraid to suck. The hard thing about reading about people doing what you want to be doing is that they so rarely share their failures. You only see them being good at it. So I’m sharing some failures of mine to let you see that I didn’t start good. I’m still not that good. I still fail. That just means I’m on my way.
What inspires you to try something new?  To persevere in the face of your failures?

Posted in Arts and Crafts, Bookbinding, Lettering, Paper Arts, Paper Cuts, Scrapbooking, Visual Arts | Tagged , , , , , , , , , , , , , | 6 Comments

Morning Routine Printable

morning routine flowchart printableSo it’s time for my daughter to run out the door and catch the bus for school, and I say, “Time to go!  Wait.  You don’t have socks on?”  “You didn’t tell me to put socks on.”  Can someone tell me why a 7-year-old, who puts on socks every single day, needs to be told to put socks on?  Or reminded to wipe after going to the bathroom for that matter?  In an effort to end our morning madness and help my daughter be more self-sufficient, I made this little (11″x17″) flowchart with fox illustrations.  To sweeten the pot, I added spots to mark successful days, and when they’re all full, I’ll take her out for a Mommy-Daughter date.

fox in 3 piecesVector illustrations are still pretty new to me, but this was pretty easy.  I drew the fox head, body, and tail separately so I could arrange the pieces for different poses without redrawing the fox every time, and I also feel this added continuity to the illustrations.  If you like it the way it is, go ahead and click on the picture and print it, but if you want to make alterations (color, wording), here is the Adobe Illustrator file (the font is called Bellota, free, available here).  Or you could use these three PNGs (images with transparent backgrounds) of the fox and manipulate them to make your own.

Also, part of our morning routine involves singing a song, reading a scripture story, and saying a family prayer (we call it SSP), so this is the version of the flowchart we’re actually using:

morning routine printable with song scripture prayer

Posted in Digital, Visual Arts | Tagged , , , , , , , , , , | 2 Comments

Three Things I Learned Sewing Curtains for my Daughter

3 Tricks for sewing painless curtainsI’m not a seamstress, but having attended Pinterest University, I’ve learned a lot about sewing.  I recently decided to add some color and privacy to my daughter’s room, and being a DIY-er to my very core, I of course could not possibly buy curtains.  That would be lunacy.  So I made them, forgetting how hard it is to get nice gathers, how tedious pinning and hemming is, how I don’t have a serger to finish raw edges.  What did I learn in this endeavor?

Nice even gathers

  1. Zigzag stitch over strong fishing line or dental floss for your gathers.  That long basting stitch my mom taught me?  You know the one that snaps every time you try to pull to make gathers?  Fuhgettaboutit.  When you zigzag over the floss or fishing line, you can pull and adjust the gathers exactly how you like, sew, and the floss or fishing line slips right out when you’re done.
  2. No straight pins!  Use clothespins instead.  Seriously.  Bam, bam, bam!  You’re done.  Using clothespins instead of straight pins was so much faster and easier, and if I drop a clothespin, I don’t have to be afraid that it will somehow become embedded in the carpet and I’ll kick it with my big toe.
  3. Perfect rolled hemRolled hem presser foot?  What’s that?  Totally unnecessary, that’s what.  I’m not a fan of extra, super-specialized tools.  I have too many interests to be getting a special tool for every little thing I want to do, and from the tutorials I’ve seen on YouTube, I’m pretty sure my method is just as easy and maybe even neater.  I have a roll of cash register paper that I got for 50¢ at the thrift store, and I ripped off a strip the length of my hem.  curtain tabs with narrow rolled hemsI sewed it to the right side of the fabric with 1/4″ seam allowance, ironed it flat, turned the paper in to the wrong side of the fabric, and top stitched the hem to keep it down.  Then I just tore the paper away and was left with the neatest, most evenest (double superlative!) hem I have ever sewn in my life.  For the tabs at the top, I hemmed them in one big long strip, then cut them to size for the tab.  Go here for a full tutorial on this technique.
  4. No frayed edges with French seamsAnd a bonus that I did not learn for this project but from sewing a dress for my other daughter:  French seams.  I don’t have a serger and won’t be getting one any time soon (see #3).  But who wants their seams fraying?  Not me.  So when I sew a seam, I first sew wrong sides together with a narrow seam allowance, iron, then turn the fabric right sides together.  This sucks the raw edges into the seam, so no fraying.  It works much better than zigzagging, and is only a little more effort.

So tell me, what have you learned from Pinterest University?

Posted in Fiber Arts, Sewing | Tagged , , , , , , , | 3 Comments

Grain Matters

book with buckling in the gutter

I just bought this book for my girls from the school book fair.  Darling story, but the quality of the binding is really annoying me.  It is obvious that the Chinese “bindery” from whence it came was too stingy to align the grain properly. One of the first things you learn as a bookbinder is that paper has a grain direction, and the grain should always run parallel to the spine.  This is because paper expands more across the grain than along with the grain.  If the grain is perpendicular to the spine, as the paper expands and contracts with changes in humidity, it can weaken your stitches and wrinkles appear in the gutter just like in the book pictured above.  Additionally, the pages will be stiffer and not lay flat when open.  If you fold a thick paper perpendicular to the grain, the fold will be messy, not crisp, and the fibers in the paper will break.  Paper tears and folds more easily and neatly parallel to the grain.

sushi mat

A sushi mat is like a blow-up of paper grain.

Think of a sushi mat.  This is pretty much exactly what we’re talking about when we talk about paper grain. In the case of the mat, folding across the “grain” would snap all the little sticks, but it rolls and folds neatly along the grain.  So when you’re binding, you want the sticks parallel to the spine, not sticking out of it.

Most of the time, grain runs parallel to the long edge of your paper, but not always.  When I determine paper grain, I gently fold the paper without creasing it and sort of bounce my fingers on the fold, and then fold it again at 90 degrees to the first fold to see which way has more give.  This is the most non-invasive way to determine grain.  If this method doesn’t work for you, try tearing a strip from two edges at 90 degrees to each other and see which one is neater.  The strip was torn along the length of the grain and your spine should be parallel to this edge.  Another way is to tear out a rectangle and mist it with water.  Paper grIt will immediately curl and the grain is running the from end to end of the this sort of cylinder.  Make sure you do this test with a rectangle, not a square, so you know how your little scrap was oriented in the larger sheet.

The only time I’ve ever seen a high end binder break the paper grain rule was when the book was too large to orient the grain properly.  Even though she used very high quality paper, you could see some very slight buckling in the gutter.  In a case like this, you could do a single sheet binding and avoid that problem, but this extremely large book was for an exhibition and would have to lie flat open for several months, so a single sheet binding was not an option.

If you would like to read more about paper grain, head over to the Center for Book Arts’ blog entry on the subject.

Posted in Bookbinding, Paper Arts | Tagged , , | Leave a comment

DIY Young Maleficent Costume, Wings, and Horns

Young Maleficent Costume TutorialI love Halloween because I get to let the costume designer out of the closet and run wild.  It’s great because my older daughter generally has some pretty interesting ideas for costumes.  This year, she wants to be a … (drumroll, please) … cat.  I know.  Big fat let down for me, too.  But my younger daughter is still a little too young to be choosing Halloween costumes, mostly because she doesn’t get what Halloween is, so I’m choosing.  Earlier in the year, we went to see Maleficent, and we all loved it.  The younger one kept running around, hopping on things, and shouting, “I’m Meficent!”  Now she says “Leficent.”  But that’s when I decided I would be the best mom ever and make her a young Maleficent costume.

I drafted a pattern based on one of her dresses, making the sleeves pretty wide like bells.  The skirt is just a wide tapered panel that I gathered.Bodice and sleeve pattern pieces

The part where I innovated was on the texture for the dress.  I cut out double of everything, one set out of an old men’s shirt (preserving the hems and buttons–who wants to do the finish work when you don’t have to?), and another set cut on the bias out of a patterned brown fabric.  I sewed the doubles together with long parallel lines about an inch apart, sewed the dress together, then cut the top patterned layer of fabric in between the lines of stitching.  I cut it on the bias so I could have these raw edges without excessing fraying.  I twisted the dress tightly to wrinkle the fabric.  I love the texture this technique created.Maleficent dress texture

The wing I designed to fold over and is the length of her armspan from fingertip to fingertip, attached at the back of the dress with a safety pin (elegant, I know) and with elastics at her wrists.  Make sure those elastics are pretty loose.Maleficent wing pattern piece

I lucked into a golden brown feather patterned fabric on clearance.  I recommend you do the same.  I gathered the wings where they meet between her shoulder blades just cuz.golden brown feather fabric wings

I’m impressed with myself already, but we’re not even done.  The horns are the pièce de résistance, and also the easiest and quickest.  A headband, foil, and electrical tape are all you need.  And of course, an eager almost-three-year-old. DSC_0030

I formed the horns out of foil. The tricky part is making them symmetrical, and for that, I recommend cutting two pieces of foil the same size every time you add more foil, and working the horns at the same time instead of making one, then trying to copy it.foil Maleficent horns

After I got the right twistiness and everything looked about right, I taped the horns to the headband, then added a little more foil around both the horns and headband to make the horns stable.attach foil Maleficent horns with electrical tape and more foil

Then I spiraled up and down with the electrical tape until the horns were completely covered, and they were done!Electrical tape Maleficent horns

The horns are surprisingly sturdy. I’m just worried about the headband breaking before she even gets to go trick-or-treating on Halloween because I can’t pry it off her.

Posted in Arts and Crafts, Fiber Arts, Sewing | Tagged , , , , , , | 3 Comments

Perfect No Wheat High Protein Buckwheat Buttermilk Pancakes

DSC_0019I don’t hate wheat.  I am suspicious of wheat, but I love buckwheat, which is not even a grain.  It’s actually related to rhubarb and sorrel, full of flavinoids, manganese, and magnesium; is linked to low LDL cholesterol and high HDL cholesterol; and has good quality, non-gluten proteins.  Read up about it on the World’s Healthiest Foods.

I have been perfecting this recipe for quite some time, and it’s too good not to share.  They’re everything pancakes should be, yet shockingly nutritious, high in protein and omega-3 fatty acids. This recipe has its origins in an herbivoracious recipe for buckwheat buttermilk pancakes.  If you can’t find roasted chickpea (garbanzo) flour, get the plain kind and roast it yourself.  It’s very easy to roast yourself on the stovetop-just stir it around in a dry pan (I prefer a cast iron skillet) until it browns to a nice caramel color.  Takes only a few minutes.  Don’t use the flour unroasted because it will taste a little sour.

  • 1 1/2 cups buckwheat flour
  • 1 1/2 cups roasted chickpea flour
  • 1/4 cup chia seeds
  • 1/4 cup hemp hearts
  • a handful of ground flaxseed
  • 1/2 cup walnut bits
  • 3 tablespoons sugar
  • 1 tablespoon baking powder
  • 1 teaspoon baking soda
  • 1  teaspoon salt
  • 3 cups buttermilk
  • 6 tablespoons unsalted butter, melted
  • 4 eggs
  1. Mix everything dry together–I mean everything, even the walnuts.  You want the dry stuff evenly dispersed, but you don’t want to overmix.
  2. Mix everything wet together.
  3. Combine and mix just enough that there’s nothing dry left.
  4. Let sit for about 10 minutes to let the chia soak up the liquid and expand–this is the key to a nice moist but not doughy pancake.
  5. Warm up your griddle and coat it with just a bit of oil once it’s hot.
  6. Drop 1/4 cup fulls of batter on the griddle and flip when the edges start to look a little dry and a few bubbles have burst on the surface of the pancake.

Enjoy!  Serve with butter and jam, or as I like to, with peanut butter and syrup.  I know what you’re thinking, but like pineapples in lasagna, don’t knock it ’til you try it.

Posted in Breakfast, Culinary Arts | Tagged , , , , , , , , , , , , , | 1 Comment

The Hows and Whys of Bookbinding with a Sewing Frame

DIY sewing frameWhen I first learned bookbinding, we did not use sewing frames.  It wasn’t until I started learning more advanced techniques that I first used a sewing frame.  At the time, it seemed unnecessary and a bit of a nuisance.  The struts just got in the way, and I didn’t think it made sewing any easier.  However, now that I’ve made lots and lots of books, my views have changed.  Firstly, pre-punching signatures takes A LOT of time, so I abandoned my punch cradle.  Now I stack the signatures together and use a saw to cut the holes all at once.  This does not work for my albums, however.  Because of the guards, I can’t stack them easily, and clamping them together to saw gets them all out of alignment again.  It’s a headache.  Since I’m only going through two layers of paper for these albums, I don’t really need pre-made holes to make pulling the needle and thread through easier, just to keep everything in alignment.  Have to keep tapes straight and bookblock square

So my thoughts returned to the sewing frame.  This could keep my linen tapes straight.  Now if only those darn struts would get out of the way.

Behold, the marvel of engineering:  the cantilever!Cantilever bookbinding sewing frame

This sewing frame took me a single naptime to make.  So easy.  And you want to know what’s even better?  It took me the same amount of time to sew the book block as it usually does, but without all the time pre-punching the pages.  Such a time saver, and as we discussed in my previous post, time is money.

To make your own, you will need:

  • Two 3/4″ hardwood squares (next to the dowels at the hardware store)
  • One 1/2″ dowel
  • A pack of four 3/4″ galvanized steel L-brackets with accompanying screws
  • Four small rubber washers (plumbing section)
  • Four wood screws
  • A piece of wood for the base of the frame (mine is a scrap left over from building shelves, 15 1/4″ x 11 1/4″, which turned out to be the perfect size)
  • A drill

I’ll give you my measurements for everything if you want to replicate it exactly, but it’s not hard to figure out if you want to make one smaller or bigger.

Cut four pieces of the 3/4″ hardwood square at 11 1/4″, and one piece at 13 3/4″.  Cut the 1/2″ dowel at 15″.  Every time I tell you to screw something, read, “Pre-drill, then screw.” Don’t skip pre-drilling.  You think it’s faster just to screw until you split the wood and have to start over, only you don’t have any more wood so you have to go back to the hardware store, which means you just wasted naptime.  Don’t skip it.  Screw the struts to the cantilevered portion of the frame with the L-brackets, then screw those to the base.  Screw the longer piece between the cantilevers with wood screws.  Construct frame using galvanized steel L-brackets

Screw the dowel under the front of the base using the rubber washers as spacers. And you’re done!  Easy peasy lemon squeezy.  Use rubber washers as spacers between the base and dowel.

I used regular size binder clips to secure the tapes to the dowel and mini binder clips to keep the tapes looped over the strings hanging down.Use binder clips to hold your linen tapes in place.I have plans for adding a fence to jog the signatures against to keep everything square, but for now, I’m just using my boxmaking weight.  Don’t know what that is?  Guess you’ll have to stay tuned to find out 😉

Posted in Bookbinding | Tagged , , , , | 3 Comments